UT-88. Using OS CP/M. Part 2/2.
In this post, we will check some programs for CP/M and learn how to load your programs on “RAM-disk”.
External command POWER is intended to work with files in a RAM and the “RAM-disk”. It allows you to view files, edit them, rename or erase them, and view and edit data in RAM. POWER also can display information about a disk, test it and isolate malfunctioned areas.
The program can be loaded from a tape. After the POWER command is entered, the following invitation message appears:
А!
The POWER command recognises meta symbols as well. For instance, to view a file list with files that have R as the first character in their names, the following command can be used:
А! R*.*
To see the list of all commands that can be used in the POWER program, you can use this command:
А! ?
The following command shows the list of all hidden commands:
A! ??
For the disk test, you can use this command:
А! TEST
The disk will be read, a control sum be generated, and damaged sectors will be isolated in a file “===.===” for further decisions.
Disk info, including its capacity and format, can be shown with the following command:
А! DISK
Free disk info as well as file statuses (R/W ― read & write, R/O ― read-only) can be displayed with this command:
А! STAT
To see a file list command, DIR is used.
CommandSORT is used for file sorting.
There are five ways to sort files:
А! SORT 1 (by file names)
А! SORT 2 (by file names but with executable files at the end)
А! SORT 3 (by file extensions)
А! SORT 4 (by file extensions but with system files at the end)
А! SORT 0 (without any sorting)
Files can be renamed with the REN command:
A! REN *** (old name)
To mark the file as a system and make it visible only for CP/M command, SETSYS is used:
А! SETSYS *** (file name)
Command SETDIR is opposite to SETSYS command.
To change file status to “read-only”, the command SETRO can be used:
A! SETRO *** (file name)
Command SETWR changes file status to “read & write”.
Very detailed file info can be received with the SIZE command.
The first column shows the sectors that are used, the second – is free sectors, the third – is the file size in Kbytes, and the fourth – is the size of the group of files in Kbytes.
Commands to copy data from RAM to disk and back:
1. А! LOAD (имя файла, тип) ХХХХ
This command loads the file from a disk to RAM from address ХХХХН > 4000Н.
After that, the command shows the end RAM address and amount of sectors the file uses.
2. А! SAVE (name.ext) ХХХХ YY
This command loads a file from RAM to a disk from address ХХХХН to disk, taking YY sectors (if the file has been previously loaded with the LOAD command and its size hasn’t been changed, then the number of sectors can be voided).
3. DUMPA ― view file as ASCII characters.
DUMPH ― view file as hex data.
DUMPX ― view file in both formats.
There are several ways of using the command DUMP:
A! DUMPH ХХХХ YYYY ― show data from address ХХХХН to YYYYH
А! DUMPH XXXX,N ― show N bytes of data from address ХХХХН.
A! DUMPH ХХХХ ― show all memory starting from address ХХХХН.
4. To view and edit text command DS is used:
A! DS ХХХХ
ХХХХН ― starting address. The following data is displayed:
address, hex code, decimal code, binary code, ASCII code, ENTER (.)
ENTER ― shows in which code type changes are going to be made: (А), (Н), (В), (D). To change code command .В(.) can be used ― (code type symbol in brackets). Data can be viewed in the forward or back direction. To change a direction to the opposite, “^” needs to be entered. The “-” symbol will be added to address in the back direction used. To exit from the editor, two dots are entered.
5. Fill a memory range with a constant
А! FILL ХХХХ YYYY ZZ
Start address ХХХХН; end address YYYYH, and the constant ZZH.
6. To move the memory range command MOVE is used:
А! MOVE ХХХХ YYYY ZZZZ
ХХХХН ―start address, YYYYH ― end address, ZZZZH ― new start address.
7. Comparison of two memory ranges can be made with СМ command:
А! СМ ХХХХ YYYY ZZZZ
XXXXH, YYYYH ―the first and the last address of the first memory range, ZZZZH― the start address of the second memory range.
8. Command SEARCH searches a string in memory.
This command displays addresses and data (in ASCII format) of cells that match the search string. The string length can be up to 128 characters.
А! SEARCH (start address) (end address) (byte) (byte)
Usually, the command searches hex codes, but if you put a search character in quotes, it will search the ASCII symbol.
There are several commands in POWER to launch programs:
1. Command GO reads a program from disk, loads it to RAM and launches it. It is convenient to launch programs that have to be run from a different address than standard 100Н.
A! GO (file name) ХХХХ
ХХХХН ― address to load a program from.
2. Command JP allows running a program already in RAM from a specified address. Exit from POWER happens after that:
А! JP ХХХХ
ХХХХН ― start address of a program.
3. Command ЕХ is the same as the previous one but returns to POWER after that.
In this case, a program has to have code С9 (RETURN) at the end.
4. Command RUN loads and runs one or several files.
Command CHECK is used for control sum calculation:
А! CHECK (file name)
Also, there is a command to exit from POWER to СР/М:
А! EXIT
Let’s have a look at some other CP/M programs.
ED.СОМ – a text string orientaded editor. Its description can be found here.
L80.СОМ – a program that links files after translation to an executable program. Also, it merges several files in one. Its description is here: LINK-80.
M80.COM – Microsoft MacroAssembler. Allows to write programs in Assembler language. Its description is here: MACRO-80.
MBASIC.СОМ – BASIC interpretator.
BASCOM.СОМ – BASIC compiller.
Most CP/M-80 (CP/M 2.2) can work on this computer. Many of them even don’t need any additional adjustments or installations. If you have a CP/M program that you want to use on this computer, you can follow these steps to load it there:
- An emulator from here needs to be downloaded.
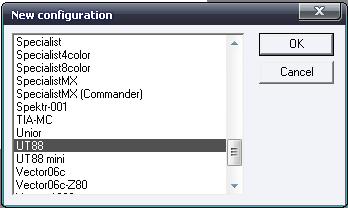
- Launch it on any Windows computer and choose “UT88”.
- Go to View > Start Debugger to open the debugger window.
- Press Ctrl-L, enter 0x0100 in the field From and select your CP/M file.
- Now the file is loaded to the emulator’s memory. But before you close the debugger window, find your program’s last address in memory. To do this, scroll the screen until uninterrupted zeros appear to address E000. Remember or write off this address. Decode two high digits of the address to a decimal number. This is the number of blocks your program requires on the “RAM disk”. For instance, if the last data of the program is in cell 2F55, after which only zeros are in cells, then transfer 2F to a decimal number and get 47. It is a number of blocks on disk that this program is required. Please remember or write it off.
- Now close the debugger window, and in the emulator, enter Monitor-F command O0100,XXXX (XXXX – end address of the program (for instance, 2F55from our example). But before you press ENTER button after the command, launch the recording to wav file by clicking on this button:
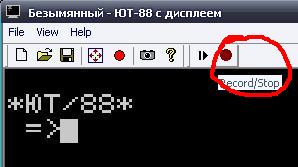
- When recording is completed and the invitation message “=>” appears, press the red circle button again to stop recording to wav file. Emulator has completed its part of the job. Now we use our computer on DE1.
- Load CP/M on your DE1 as usual, then press “RESET” (ESC button on PS/2 keyboard). Don’t forget to turn MONITOR-0 ROM before this with SW[2] switch.
- Load MONITOR-F as usual and turn off MONITOR-0 ROM (SW[2] in position “0”).
- Load the wav file that we’ve got from the emulator using the command I through LINE IN jack. If errors occur, your sound level needs to be adjusted (please read my previous post about MONITOR-F). Your program will be loaded from address 0100.
- After successfully loading the program, CP/M can be launched by “hot start” with the GDA00 command.
- Now we can save the program to “RAM-disk” with the SAVE command using the number of blocks you’ve recorded in step 5 and a file name. For instance:
A> SAVE 47 M80.COM
Now you can save the file to tape using CHcommand to load it straight to CP/M later. Or you can create a memory dump with this file, as I explained in my previous posts, through a USB JTAG interface.
This computer doesn’t have a lot of programs. So, if you adapt or create any other programs for it and send them to me, I’ll add them to the library. Simple programs are easy to load through LINE IN, but a memory dump is much more convenient for big ones or collections of programs.
I hope you enjoyed the posts about this unusual computer. I think it is the final post about it, but maybe I’ll return to this topic again if any interest appears or if some new information is found.
But now we will do a much more serious project! I’m going to create a replica of another Soviet computer – AGAT-7. And this replica will use a real 6502 processor and FPGA as a replacement for the original computer ICs. See you soon!
